
James Scott
September 14, 2014
Go and App Engine: Part 2 – Development
This is part 2 of a series of posts that involve developing and publishing to Google’s App Engine with Go as the backend. In addition, it will exemplify how to take advantage of the App Engine’s new module system. This post will explore the actual development and local testing.
Module Architecture
Google has moved to from having a single frontend (with optional backends) to this notion of modules in 2013. This is important as it stresses the importance of modularizing your code. Each module should have a specific purpose. If you architect your code that way, Google will take care scaling your app appropriately.
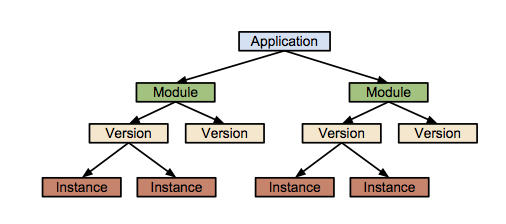
This post series won’t explore the “Version” aspect much. Possibly in a future post.
Overview
- This post will walk you through how to create two modules.
- We will call Module A (Our frontend).
- Module A will call Module B (The backend). Module B will produce an output and return it in the response body.
- Module A will display some other text with the output of Module B appended to it.
- This post will walk through modifying custom routing for the modules.
- As per App Engine Module Routing Rules (July 2014), modules will have a URL like http://module.app-id.appspot.com by default. We will change that all the modules operate under the same app-id and depending on your path, it will internally trigger the correct module.
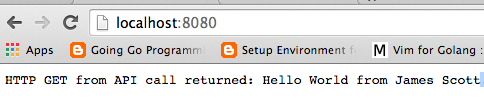
We should get something like this when we visit our frontend:
Breaking Ground (Into The Code)
Directory structure
- Inside the src folder of your GOPATH, create a new folder for your project. (You will see that mine will be called testgaeapp through this exercise). If you need help setting up your GOPATH or any other questions, refer to the my Go Setup post.
- Within this newly created project folder, create three sub-directories: frontend, backend, and config. Frontend and backend will be two separate modules and config will be a common library between the two.
Frontend
As a user, when you direct your browser to a URL via typing in a link or clicking on a URL, our frontend will be handling the initial request.
- Line 15-17: In appengine, you can’t use a Default Client from the net/http package. Instead, you use the appengine/urlfetch package to make HTTP requests from your module.
- Line 28: Just going to write to our writer what we retrieved from the request.
- Line 32: The appengine runtime does not allow for a main function as the entry point for the program. Which is acceptable. Your program is a web server that responds to requests. Instead of a main entry point, you just register the functions for each request entrypoint. One thing the appengine runtime does not change is the func init. Per the golang spec, the init function allows us to do just that.
Note: When we make the request to our api in the backend, you might want to make it a goroutine if it takes too long.
You may have noticed the config package. Let’s go ahead and address that.
Config
This library came about because I needed a way to configure deployment dependent variables (local development env vs an app engine environment; which I will show in the next post). You may think there are plenty of better ways to configure these types of settings instead of putting them purely in code, and you’re right. But it’s all you can do at this moment. I’ll walk through the better ways quickly.
- Environment variables: When it comes to deploying a service, configuration values are typically read once from environment variables. However, you can’t do that with appengine (or I couldn’t find a way).
- Values From Database: An alternative is to have the configuration values loaded from a database. However you can’t populate the Datastore DB in a command line environment. The only way to populate is via a request “localhost:8080/initmydata). At that point, your data structures are already in code.
- Read values from files: This would be the optimal, I tried briefly to upload a file which wasn’t addressable by a URL but it didn’t work out. So I went to my last resort which I implemented. I have a feeling this would work out under more investigation.
** Backend**
Our backend will receive a request from our frontend to do some work then return the answer to the frontend. Usually, you have a backend so that various types of frontends (web app, Android App, iPhone App) have a common place to talk to for data while keeping platform specific things to the separate frontends.
- Line 13 simply writes a message of our choice to the response. (You can see how you could instead add formatted json, etc with something high useful for the frontend to consume).
YAML Files
App Engine uses yaml files to configure your application. These configurations vary from application wide configs to individual module configs.
Frontend YAML File
(located in frontend/app.yaml)
Some of these fields are standard and don’t change but the ones that do matter are:
- module: There ALWAYS has to be a module named default among all modules. I just chose to call my frontend module the default module.
- application: This is the name of the over arching application. Since we are testing locally, it doesn’t matter. However, in the next post of this series when we deploy to a real server, the value of this field WILL matter.
- version: Just typical versioning of an app. Can be numbers as well.
- handlers-> url: This means any request that com at the root of our app (ex: mytestapp.com), should be handled by any handlers setup in our frontend Go code.
Backend YAML File
(located in backend/app.yaml)
The YAML file for the backend module looks similar.
Key points:
- module: It’s named backend
- handlers-> url: All requests coming from api/ of our app (ex: mytestapp.com/api), should be handled by the handlers setup in our backend code.
Dispatch YAML File
(located in dispatch.yaml)
The dispatch yaml file is completely optional but it provides some great benefits that allow us to fold both modules under one nice base URL.
Without the dispatch file, you would have to address your modules as such: http://module.app-id.appspot.com. More details on default urls.
Locally when you try your app without dispatch, each module will get address localhost:808X.
In my experience with web development, it’s best to use full URL paths (vs relative paths), which is another reason for the config library (because I have a BaseURL variable). But, with all these varying URLs for the modules (not between environments), we need to be able to unify under one base url so that when we make our request from frontend to backend, we can easily and safely construct the correct URL.
I’ll jump straight into our dispatch.yaml to do what I just said some justice.
It’s that simple. Now with the app-id.com format:
- any app-id.com/api will be handled by the rules under our backend module.
- anything else will be handled by our default (frontend) module.
Now will it all work?
Simply run this command (make sure you GOPATH is set)
** Ta-da!**
You should see some logs be generated and no error / failure messages.
In your browser, visit localhost:8080 and you should see the following:
Bonus: Hybrid App!?
Now, what if you don’t want to use App Engine to deploy your app to (maybe instead Heroku, or just your own server)? If you try to use the regular “go run” command, this will horribly fail from compilation errors because the regular go toolchain has no knowledge of the appengine libraries.
Luckily, we can use build constraints to split out and abstract functionality of runtime dependent libraries.
First thing, we need to do is create a main function. My way of doing it is to create a new file in the root of the project that uses the backend and frontend handlers.
If you remember, we already register our handlers for each module in the “init” function automatically. This is great since it registers to the global http handler. I don’t need to copy that code into my new file. However, the function is lowercase so I can’t call it (all exported functions have a capital first letter). But if I don’t call any functions from those packages, I can’t import them! (it will complain about unused imported packages). BUT!!! We can create empty functions for both of them and just call them.
Here’s my new file standalone.go
- Line 1: The build constraint.. I’m telling that you should never build this file if using appengine (because you can’t use your own main function).
- Line 7-8: Importing our two -ends.
- Line 12-13: Calling our two empty dummy functions just so we can import the packages.
Lets look at our modified backend:
Like I said, earlier, this is simply a dummy method. Plain and simple.
Now before I jump into the frontend variation, you remember there was this appengine/urlfetch library that is used in order to make an external HTTP request. We need to strip that out into a separate file. And also create a non-appengine version in another file.
Line 1: The build constraint. This time we want this variation to be used if we are using the appengine libraries.
This is just simple code taken from Appengine for Go website basically.
Now for the non-appengine variation.
A little bit more simpler. We just create a new client in line 9. And in line 1, we only want to use this version if not using appengine.
Note: In my personal side project, I have instead created a GetClient function because urlfetch.Client() and http.Client{} both return a http.Client. That would’ve been better to give us more flexibility besides only using the client for a GET in this example. That is a much better of doing it.
Now that we have ways to make outside calls, lets look at our modified frontend.
- Lines 11-16: You can see our dummy function so standalone can use it.
- Line 19: Our call to our new outside call function.
Time to run the new standalone version!
From root of the project (where standalone.go is) run:
You should see the same response as the App Engine version when you direct your browser to localhost:8080!
Next Post:
The next post is the final post in this series. I will show how to actually do the deployment of the app to App Engine!